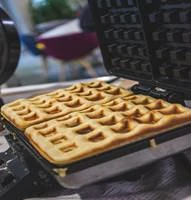
There’s something magical about the crispy grid on a waffle that traps the pools of melted butter and sweet syrup. Savory or sweet, waffle batter inevitably expands and spills out of the iron during the baking process.
Baked-on and sticky batter makes for an unwelcoming cleaning process that leaves you engulfed in immense disappointment and frustration. That’s mostly because the nooks and crannies in your waffle iron are prime batter traps.
While the obvious solution would be to give up on homemade waffles to avoid the hassle, cleanup doesn’t have to be a pain with a few tricks in your arsenal. In this guide, we’ll walk you through the step-by-step process of the best way to clean waffle iron.
How Often Should You Clean a Waffle Iron?
It’s advisable to clean your waffle iron after each use to get rid of food particles that facilitate the growth of bacteria. After a couple of uses, deep cleaning will effectively eliminate excess oil that can become rancid and ruin the flavor of your next batch of waffles.
If you only use your waffle iron once in a while, then we recommend a deep cleaning before you tuck it away in your cabinet or pantry. Although a waffle iron and waffle maker are interchangeable terms, if your appliance is electric, it requires cleaning just as you would a cast iron.
Items Required
To clean a waffle iron the right way, you’ll need the following items.
- Non-abrasive sponge (optional)
- Microfiber cloth or damp cloth
- Dishpan or sink
- Pastry brush (optional)
- Soft bristle brush
- Toothpicks
- Chopsticks
- Paper towels
- Hydrogen peroxide
- Warm water
- Dishwashing liquid
- Baking soda
The Best Way to Clean a Waffle Iron
Armed with everything you need to get the job done, follow the step-by-step process outlined below.
1. Unplug and Let Your Waffle Maker Cool
Avoid cleaning a hot waffle iron. Instead, let it cool entirely and unplug it from the power outlet to avoid any accidents. If your waffle iron has removable plates, wash them in a cleaning solution of warm water and dish soap as per the manufacturer’s recommendations. Follow the same tips for cleaning the exterior and getting rid of any batter spillage.
2. Brush Away Food Particles
Once your waffle iron has cooled, grab a soft bristle brush and dry paper towel to eliminate any stuck-on crumbs and particles. As a tip, to get rid of baked-on batter, dab it with a few drops of cooking oil to soften it. After twenty minutes or so, it’ll be a breeze to wipe down the hard and dried batter with a damp cloth and your soapy water.
3. Wipe Away Excess Oil From the Grid Plates
If you notice excess oil, grab a paper towel to effectively absorb and wipe it off. Once you fold the paper towel into a square, use the pointed edge to reach the nooks and crannies of your waffle iron. You can use a paper towel wrapped encircled in a chopstick to follow along each grid line.
4. Mix a Cleaning Solution
Mix two cups of warm water and dishwashing soap in a container. Next, dip a non-abrasive sponge or microfiber cloth in the soapy water and wring it out to drain excess water.
5. Wipe the Grid Surface
Use a microfiber cloth to get the job done. Make sure you reach the nooks and crannies of each grid line. Rinse the cloth under running water and wipe down the grids to remove the soapy residue.
6. Clean the Exterior of the Waffle Iron
Use the same cleaning solution to wipe the outside of your waffle maker. Next, rinse the soapy cloth and wipe the exterior to avoid leaving any sticky residue or soap behind.
7. Dry Your Appliance
Use a soft cloth to dry the exterior of your waffle iron. Leave it to air dry before tucking it away in your pantry or cabinet. Storing a damp appliance leaves it susceptible to rust and corrosion that result in damage.
8. Deep Clean the Waffle Iron
Even after cleaning your waffle maker, the surfaces might still have a sticky residue and might require a deep clean after each use. To get started, follow the steps below.
- Mix a paste of hydrogen peroxide and baking soda.
- Use a pastry brush or paper towel to layer the grid surfaces and the exterior of your waffle iron if it feels sticky or oily.
- Let the paste soak on the interior and exterior of your appliance for up to three hours. You might notice the paste turning brown as a result of cooking oil absorption.
- Use a damp cleaning sponge or microfiber cloth to wipe down the gunk mixed with the paste.
- Use toothpicks to effectively eliminate buildup caught in the crevices or seams.
- Let the waffle iron air dry before you store it.
Tips to Keep Your Waffle Iron Spick and Span
Now that you know the best way to clean a waffle iron, let’s explore a few pointers to keep your appliance spick and span for longer.
- Seasoning your electric waffle iron is unnecessary. To curb sticking waffles, all you need to do is brush a tad bit of vegetable oil on the plate every time you whip up waffles.
- Avoid using cooking spray to layer the grid plates, particularly if it’s not recommended in the user manual. Doing so will lead to sticky residue and build up after a while, and that’s the last thing you want.
- Avoid using sharp or metal utensils such as spatula or knives made of stainless steel to flip over your waffles or transfer them onto a plate once they are ready. That will leave abrasions on the non stick surface, causing your appliance to wear out prematurely. Instead, opt for a wooden, plastic, or rubber spatula.
- Once you invest in the best waffle cone maker, best thin waffle maker, or best waffle maker with removable plates, do not immerse it in water. That will damage it, and the goal is to serve you well for years down the road.
Conclusion
A waffle iron is a fun kitchen appliance that gives you the flexibility to delight in fresh waffles in a jiffy as your coffee maker brews a fresh cup. The best part is that the cleanup process doesn’t have to be frustrating. With these tips, you can keep your appliance spick and span.