This is how to roast delicious sweet and caramelized butternut squash in the oven for a healthy vegetarian side dish perfect for the fall and winter.
Looking for a delicious vegetable side dish? Tired of serving everything with potatoes? Well, that’s about to change! You’re about to learn how to cook a nutritious, tasty, and simple alternative that goes well with almost every main dish you can think of. It’s butternut squash!
It takes no effort to cook butternut squash. You don’t need much other than the butternut squash itself and a couple of household items you already have in your kitchen. It’ll take your next meal to another level. What’s more, it tastes so good you’ll doubt it’s as healthy as it is! In this recipe, you will peel the butternut squash, cut it in half, and then into cubes. Then toss the squash with olive oil, salt, and pepper, and place in the oven at 450°F for 20-30 minutes, until golden and tender.
What Goes Well With Butternut Squash?
Butternut squash is an all-around flavorful vegetable that goes along well with (almost) everything. Now, before I give you a couple of options to side it with, you should know butternut squash can stand on its own. Add a little cheese of your choice into the mix and you have a delicious meal in and of itself.
However, if you’re looking for a main dish to go with your butternut squash, you can try:
- Pork tenderloin
- Grilled or roasted chicken
- Lamb
- Rice, peas, parmesan cheese, and garlic – the vegetarian choice!
How To Buy Quality Butternut Squash
The best time to buy butternut squash in the U.S. is in the fall, but you can still find it during other times of the year. So, if you’re at the grocery store, how can you tell if the butternut squash you’re eyeing is a good buy? Here are a few things to look for before you put that squash in your shopping cart.
- Coloring: You want a butternut squash with a rich, yellow color to the skin that’s matte, not glossy. The deeper the color, the better. Stay away from squash that has green patches (not ripe yet) or brown patches (overripe and not likely to last much longer).
- Weight: A butternut squash should feel heavier than it looks. This means it has plenty of water and it’s freshly harvested, not dried out.
- Surface Damage: Avoid squash that has any more damage than light scratches. Otherwise, there is a higher risk of mold or bacteria. You won’t be eating the skin, so a few marks on the surface are nothing to worry about.
- Stem: If you can, purchase a butternut squash with its stem still intact. These have a longer shelf life. You want a stem that’s firm and deep brown.
- Fingernail Test: Try to gently pierce the skin of the butternut squash. If your nail goes through the skin easily, put the squash back! A hard skin shows that the squash is ready to be eaten.
How Long Does Raw Butternut Squash Last?
Once you buy that butternut squash, how long can you count on it staying good on your counter? After all, you don’t want that deliciousness ending up in the garbage, right?
The great thing about squash is that it stays fresh for a long time, especially if it’s left whole and intact.
According to eatbydate.com, fresh butternut squash can last on the counter or in the fridge for up to 3 months. You can tell if it’s starting to go bad if the squash is going soft or starting to leak liquid.
How to Roast Butternut Squash
Once you’ve brought home a nice-looking squash, here is how to roast it up to perfection:
Ingredients
This vegetable has a naturally sweet flavor on its own, so you don’t need to add much in the way of seasoning to your roasted squash. The only ingredients you need to make this healthy side dish recipe are:
- 1 butternut squash
- 1 teaspoon olive oil
- Salt and pepper to taste
Preparing Butternut Squash
Step 1: Wash with cool water
Before you start peeling the butternut squash, wash any dirt off it. You might think it’s counterproductive because you’re going to peel the skin anyway, but then you dirty your hands as you peel! You’ll eventually touch the peeled butternut squash with dirty hands. You don’t want that to happen! Give it a good scrub under cold running water.
Step 2: Peel the butternut squash
There are several ways to peel a butternut squash. The fastest and easiest one is using a vegetable peeler. You can use a chef’s or paring knife if you don’t have a peeler.
It’s best to peel away all of the skin and white or green membrane under the skin. Your squash should be fully orange before you move on to the next step. The peel of butternut squash is quite bitter and fibrous, not good for eating.
Tip: If you’re having difficulties peeling the squash, first poke a couple of holes in it with a fork, and then stick it in the microwave for 2 minutes. The heat helps loosen up the skin, making it easier to peel.
Step 3: Trim the ends
Once the butternut squash is peeled, remove both ends. Now, you should have a nice, even butternut squash ready to be cut in half.
Step 4: Cut the butternut squash in half
Cooking a butternut squash has only one troublesome area for you to take care of: cutting the tough butternut squash in half.
Cut the butternut squash in half from top to bottom. To do this, stand the squash up on the larger bottom (using the flat surface you made by removing the end). Then use a sharp knife to cut down the center of the squash.
Inside, you’ll see seeds. Before moving on to the next step, scoop them all out, along with the stringy membrane. You can save these for a crispy snack if you like.
Step 5: Chop it into little cubes
Grab your peeled, hollowed-out butternut squash and chop it into equal-sized cubes. Evenly-cut pieces will cook at the same rate, but the exact shape doesn’t need to be fully uniform.
Cooking Butternut Squash
Once you finish the prep work, get ready to put that squash in the oven.
Step 1: Preheat the oven
Begin by turning your oven all the way to 450°F. Give it a moment or two until the oven is ready. Meanwhile, line a baking sheet with parchment paper for easy clean-up.
Step 2: Put everything in place
Transfer your cut butternut to the prepared baking sheet and drizzle with olive oil. Sprinkle generously with salt and pepper and toss to coat all of the pieces well.
If you’re unsure about how much you need, for medium-sized butternut squash you can use 1 tablespoon of oil, ¼ tablespoon of salt, and 1/8 tablespoon of pepper. Scale up or down from there as necessary.
Step 3: Time to cook
Put the baking sheet in the oven and roast the squash for 20 to 30 minutes. Check on it after the 20-minute mark. Once the butternut squash is golden brown or tender, it’s good to go. You’re done!
Enjoy the rich flavor of butternut squash as either a main dish or as a side dish. In conclusion, all you need to do to enjoy this food is peel and chop the squash into cubes, season it, and bake it.
A Tasty Alternative: Roasted Butternut Squash Halves
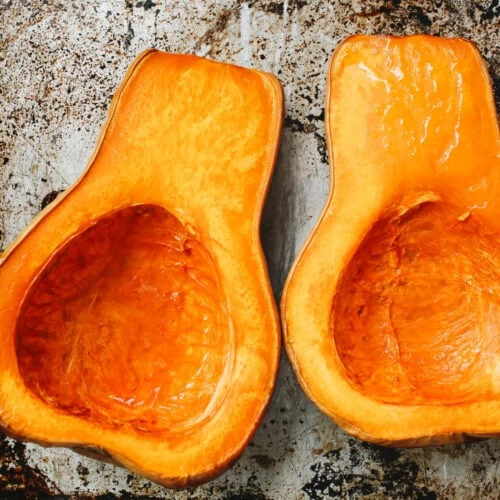
If you don’t want to peel and cut your butternut squash into cubes – no worries! You can roast the squash halves.
Once you’re done washing your butternut squash, follow these three simple steps:
Step 1: Cut the butternut squash in half and scoop out the seeds
Just as you were going to do before, cut your butternut squash in half from top to bottom. Scoop out the seeds. There’s no need to peel it or remove the ends.
Step 2: Prep the butternut squash
Once you have hollowed-out butternut squash, place it on your baking sheet cut side down. Add a little bit of olive oil. Add salt and pepper to taste–if it’s not enough, you can add a little bit more after you take it out of the oven.
Step 3: Into the oven it goes
Preheat the oven to 425°F (220°C) and place your halved butternut squash inside. Roast for 40 minutes and check if the butternut squash is tender. If it is, you’re good to go!
Roasted Butternut Squash
Equipment
- Baking sheet
- Parchment paper
- Spatula
- Cutting board
- Chef's knife
Ingredients
- 1 butternut squash peeled and cut into cubes
- 1 tbsp olive oil
- salt and pepper to taste
Instructions
- Preheat the oven to 450°F. Line a baking sheet with parchment paper.
- Transfer your cut butternut to the prepared baking sheet and drizzle with olive oil. Sprinkle generously with salt and pepper and toss to coat all of the pieces well.
- Roast for 20 to 25 minutes, until golden and fork-tender.

